|

A few days ago , I set to and started designing my 1st ever 'difficult' shawl. I had knitted the triangular ones, many times for my on-line shop and incorporated many styles of lace patterns and picot edges. I had designed a crescent shaped shawl that involved rows and rows of wonderful bobbles and lace and that got its shape from the short row shaping I had used. But I had never knitted anything more than this. I knew there were some really gorgeous shawls out there, Ravelry, Pinterest etc were full of them. So why didn't I just knit one that I liked, learn the easy way.
|
 |
Oh No! , that's not me. I decided to start from scratch and design my own.
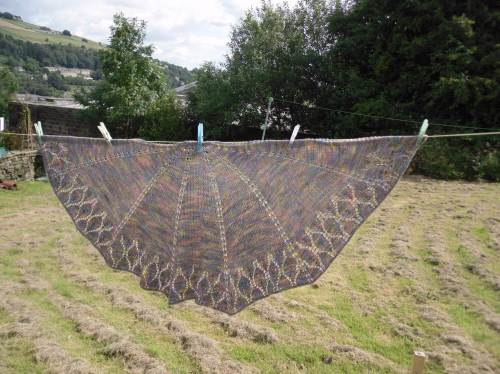
I had this vision of the shawl radiating out from a central point on the neckline , a bit like a fan and that I would use the standard Yarn Over increases on spokes of the fan to spread the shawl wide. All I knew was when the shawl was wide enough I would incorporate a lovely horsehoe lace pattern I had found. That was my designing done!
Why I didn't get my charting software out at this stage I don't know. I just knitted away.
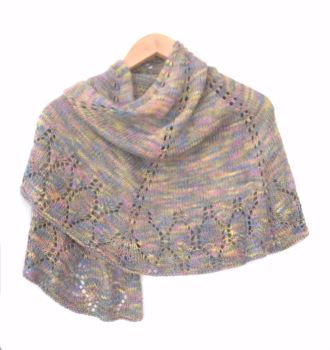 |
The shawl in the photo is the finished result. It's a lovely piece of work , sits beautifully on the shoulders and drapes really well. The lace pattern is distinctive too.
But, when I came to write up and chart the pattern from my notes afterwards I came to see where I could have made the lace pattern look a lot better and the pattern writing a lot simpler. A simple shift of when I started the lace pattern in one of the side panels soon resolved this. Bit annoying, if only I had charted the lace pattern before I started knitting instead of just thinking it would all work out OK.
Lesson learnt I think.
|
| |
|
Here is the perfected pattern for you. Have fun x
Finished size:- Radius of circle 2' 2" / 66cm , Diameter 4'4" / 132cm
Yarn: Sublime , Sophia 5 x 50 gram balls (each 120 yards).
Needles: 4.5 mm (UK 7, US 7 ) circular needles
INSTRUCTIONS
Cast on 3 sts on 4.5mm needles using the cable cast on technique
Knitting the garter stitch top edging.
Knit 8 rows.
Rotate the work clockwise @ 90 degree angle so that the left side is facing upwards.Pick up and knit 4 stitches from this side edge.Rotate the work again, another 90 degrees and pick up and knit 3 stitches from the cast on edge.
Set up rows for general shawl increases.
Row 1 (WS): K3 , Kfb 4 times, K3 (14 sts).
Row 2: Knit,
Row 3: K3, P8, K3.
Row 4: K3, (YO, K1) 4 times, (K1, YO) 4 times, K3 (22 sts).
Row 5: K3, P16 , K3.
Row 6: Knit.
Row 7: As row 5.
Row 8: K3, (K1, YO) 6 times, K4, (YO, K1) 6 times, K3 (34 stitches)
Row 9: K3, Purl to last 3 stitches, K3
Row 10: Knit.
Row 11: As row 9.
Row 12 (RS): K3, k2 (YO, PM, K1, YO, K3) 3 times , (K3, YO, PM, K1, YO) 3 times, K2, K3 (46 sts).
Row 13: As row 9.
Row 14: Knit.
Row 15: As row 9.
General shawl increases
Row 1: K3, (knit to marker, YO, K1, YO) 6 times, knit to last 3 stitches, K3. (+12 stitches from row previous).
Row 2: K3, Purl to last 3 stitches, K3
Row 3: Knit.
Row 4: As row 2.
Repeat the above 4 rows until you have 286 stitches on your needles and are ready to start the YO increases again.
Your shawl should now be made up of the following - 3 Selvedge + 23 Edge Panel + 1 +45 Side Panel + 1+ 45 SidePanel + 1+ 48 Middle Panel + 1 + 45 Side Panel + 1 + 45 Side Panel + 1 + 23 Edge Panel + 3.
Set up row for the lace pattern.
For simplicity I have broken the row down into the separate panels.
Row 1:
Selvedge & Edge Panel: K4, (1st row of lace pattern) twice, K2, YO, K1
Side Panel: YO, K3 , (1st row of lace pattern) 4 times, K2, YO, K1,
Side Panel: YO, K3 , (1st row of lace pattern) 4 times, K2, YO, K1,
Middle Panel: YO, K3 , (1st row of lace pattern) twice, K3 , (1st row of lace pattern) twice K2, YO, K1,
Side Panel: YO, K3 , (1st row of lace pattern) 4 times, K2, YO, K1,
Side Panel: YO, K3 , (1st row of lace pattern) 4 times, K2, YO, K1,
Edge Panel & Selvedge : YO, K3, (1st row of lace pattern) twice, K3
Row 2 and all even rows: K3, Purl to last 3 stitches, K3
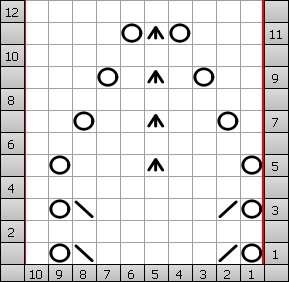
k = knit, p = purl, yo = yarn over
Cdd = central double decrease
k2tpg = knit 2 together
ssk = slip, slip, knit them together
. |
|
Row 1: Yo, k2tog, k5, ssk, yo, k1
Row 2: p
Row 3: yo, k2tog, k5, ssk, yo, k1
Row 4: p
Row 5: yo, k3, Cdd, k3, yo, k1
Row 6: p
Row 7: k1, yo, k2, Cdd, k2, yo, k2
Row 8: p
Row 9: k2, yo, k1, Cdd, k1, yo, k3
Row 10: p
Row 11: k3, yo, Cdd yo, k4
Row 12: p |
Work through all 12 rows of the lace pattern, incorporating the YO even increases on every 4th row. The YO’s are on each side of the knitted stitch that breaks up the panels.
You should now have:- 3 Selvedge + 26 Edge Panel + 1 +51 Side Panel + 1+ 51 SidePanel + 1+ 54 Middle Panel + 1 + 51 Side Panel + 1 + 51 Side Panel + 1 + 26 Edge Panel + 3.
The lace pattern is now moved across 5 stitches.
Row 13:
Selvedge & Edge Panel: K9, (1st row of lace pattern) twice, YO, K1,
Side Panel: YO, K1, (1st row of lace pattern) 5 times, YO, K1,
Side Panel: YO, K1, (1st row of lace pattern) 5 times, YO, K1,
Middle Panel: YO, K1 , (1st row of lace pattern) twice, work 1st 5 stitches of lace pattern , K3, work last 5 stitches of lace pattern , (1st row of lace pattern) twice, YO, K1,
Side Panel: YO, K1, (1st row of lace pattern) 5 times, YO, K1,
Side Panel: YO, K1, (1st row of lace pattern) 5 times, YO, K1,
Edge Panel & Selvedge : YO, K1, (1st row of lace pattern) twice, K8
Work through all 12 rows of the lace pattern again , incorporating the YO even increases on every 4th row.
Work another 2 rows, working the YO increases and working the final row of the middle panel.
Knit 2 rows
Cast off.
Gently steam block the shawl and weave in all the ends.
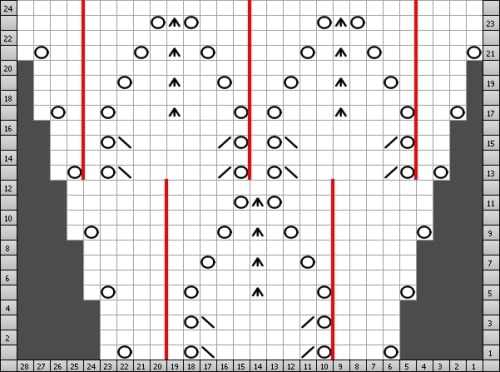
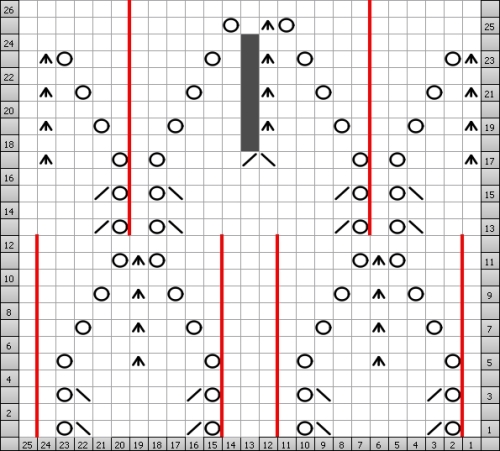
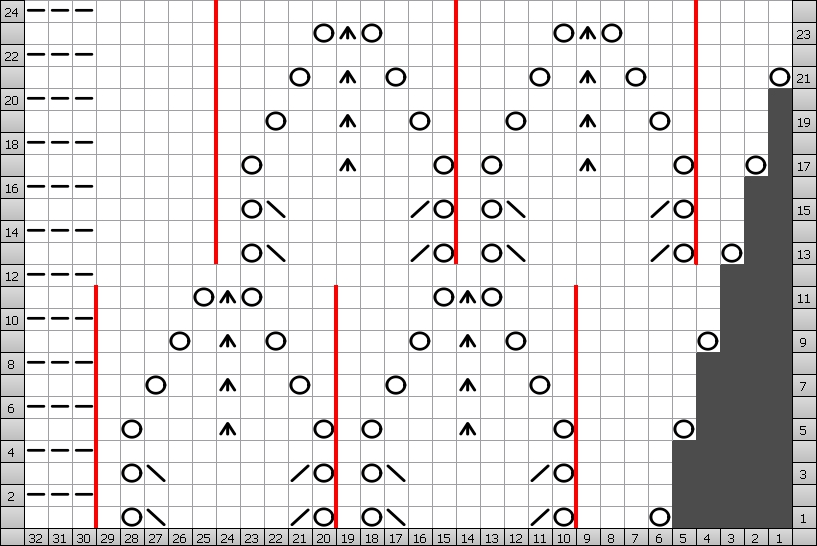
Now for some charts
Start Selvedge & Edge Panel
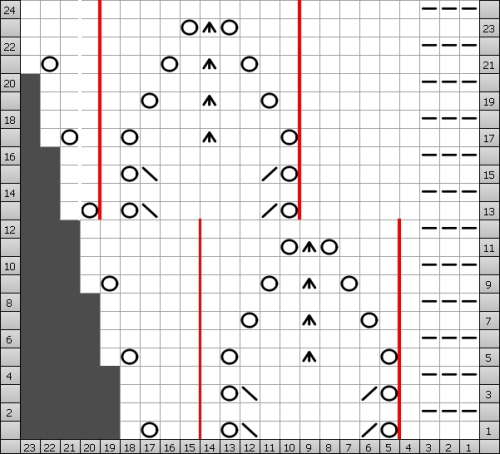
Side Panel is knit 4 times.
The Middle panel starts and ends just the same as the side panels. However there are 3 'extra' stitches that are incorporated into the pattern in the middle of the middle panel.
End panel and selvedge
Any problems , then just get in touch
More shawl patterns and knitting kits in store
